Showing posts with label Bike Tips. Show all posts

3/05/2021

Tips for Cycling During the Transition to Spring

The months of March and April in Minnesota can present all kinds of weather for those that are itching to get out on the bike after a long winter.  These fluctuations can present some challenges to getting out and riding but can be overcome.  Over the years of riding during the "shoulder seasons" I have learned a few things that make the ride a little better and safer.  Below I will share with you some of my tips for cycling during this transition into spring.

With singletrack closed during the freeze/thaw cycle transition into spring, there are options to still ride. This time of year I like to take to the road whether it be gravel or paved. Road hazards are more plentiful than summer months so keep your eyes always scanning your line of travel. Those not comfortable with riding on the road may choose to stick to bike paths and paved trails. If so, use caution at crosswalks and intersections so motorists that aren't used to seeing cyclists this time of year see you.

This transition time of year can present numerous hazards in the roadway that need to be avoided. These can include snow, ice, sand, branches, leaves and litter. Scanning the roadway ahead of you will help you identify these hazards so an evasive maneuver can be safely executed. Dark and low light times require a headlight to help illuminate the roadway to see potential hazards in time. Adjust the headlight beam according your rate of speed so as not to overdrive the lit portion ahead of you.  Doing this will give more time to react when a hazard is identified. 

Ice can present a problem when riding in the morning or after dark as temperatures can dip below the freezing point.  What may appear like wet pavement may be a very thin layer of ice that can take a cyclist down.  I will usually end up walking my bike across the icy section if it is on an uphill or downhill and slowly roll across in a straight line unclipped from my pedals on flat sections.

Gravel roads are always popular with cyclists this time of year as they are a way to get in some saddle time while waiting for the singletrack to dry out.  They can be a little sloppy with snow melt and the occasional rain shower so you may want to strap on some fenders to keep from slinging limestone mud all over your backside.  These low traffic roads provide great scenery, elevation change and challenges like tackling the wind out in the open.  If you're looking to get your bike legs back after a long winter, gravel roads are a great place to start.

Weather can be all over the board in March and April so I follow the forecasts for the time I will be riding. Knowing the forecast will help you choose the proper apparel and be prepared for weather changes.  I never get caught off guard by a passing shower or other inclement weather changes because I will bring extra apparel just in case. I've had to break out my barrier jacket on numerous occasions to stay dry.

The months of March and April tend to have frequent windy days and having good wind resistant apparel will make your ride more comfortable. Wind can make 30°F feel more like 18°F (windchill index) so in addition to a windproof shell, additional layering may be required. I have windproof apparel pieces that cover core, legs, hands, feet, head and face to choose from for varying conditions. Cut the wind to cut the cold.

Temperatures during the shoulder season will determine the proper footwear and sock choices.  I always wear wool socks for the cold but they also help regulate temperature so if it warms up during a ride my socks will wick moisture and keep my feet comfortable.  I will wear a cyclocross style insulated boot until it is warm enough to break out the road shoes.  For those chilly morning or evening rides and when road conditions are wet I like to wear a pair of waterproof shoe covers to keep my feet warm and dry.  They can easily be removed and stored in a jacket pocket if temperatures rise where they are not needed.

I'm an advocate of daytime running lights and use them year round to be better seen by motorists. They are especially useful this time of year because motorists are not used to sharing the road with cyclists. Increase your odds of being seen by always using daytime running lights. 


Rain and melting snow snow will leave roads and paved trails wet and puddle laden. Fender use will help keep you dry and your cycling apparel clean on those days they are needed. Clip-on fenders are a good choice for those that don't want them on all the time. I carry an Ass-Savers fender in my frame bag so I have it handy in the unexpected event that I may need to use it. It's a minimalist rear fender that needs no tools to clip under my seat but does the job nicely at keeping my ass dry. 

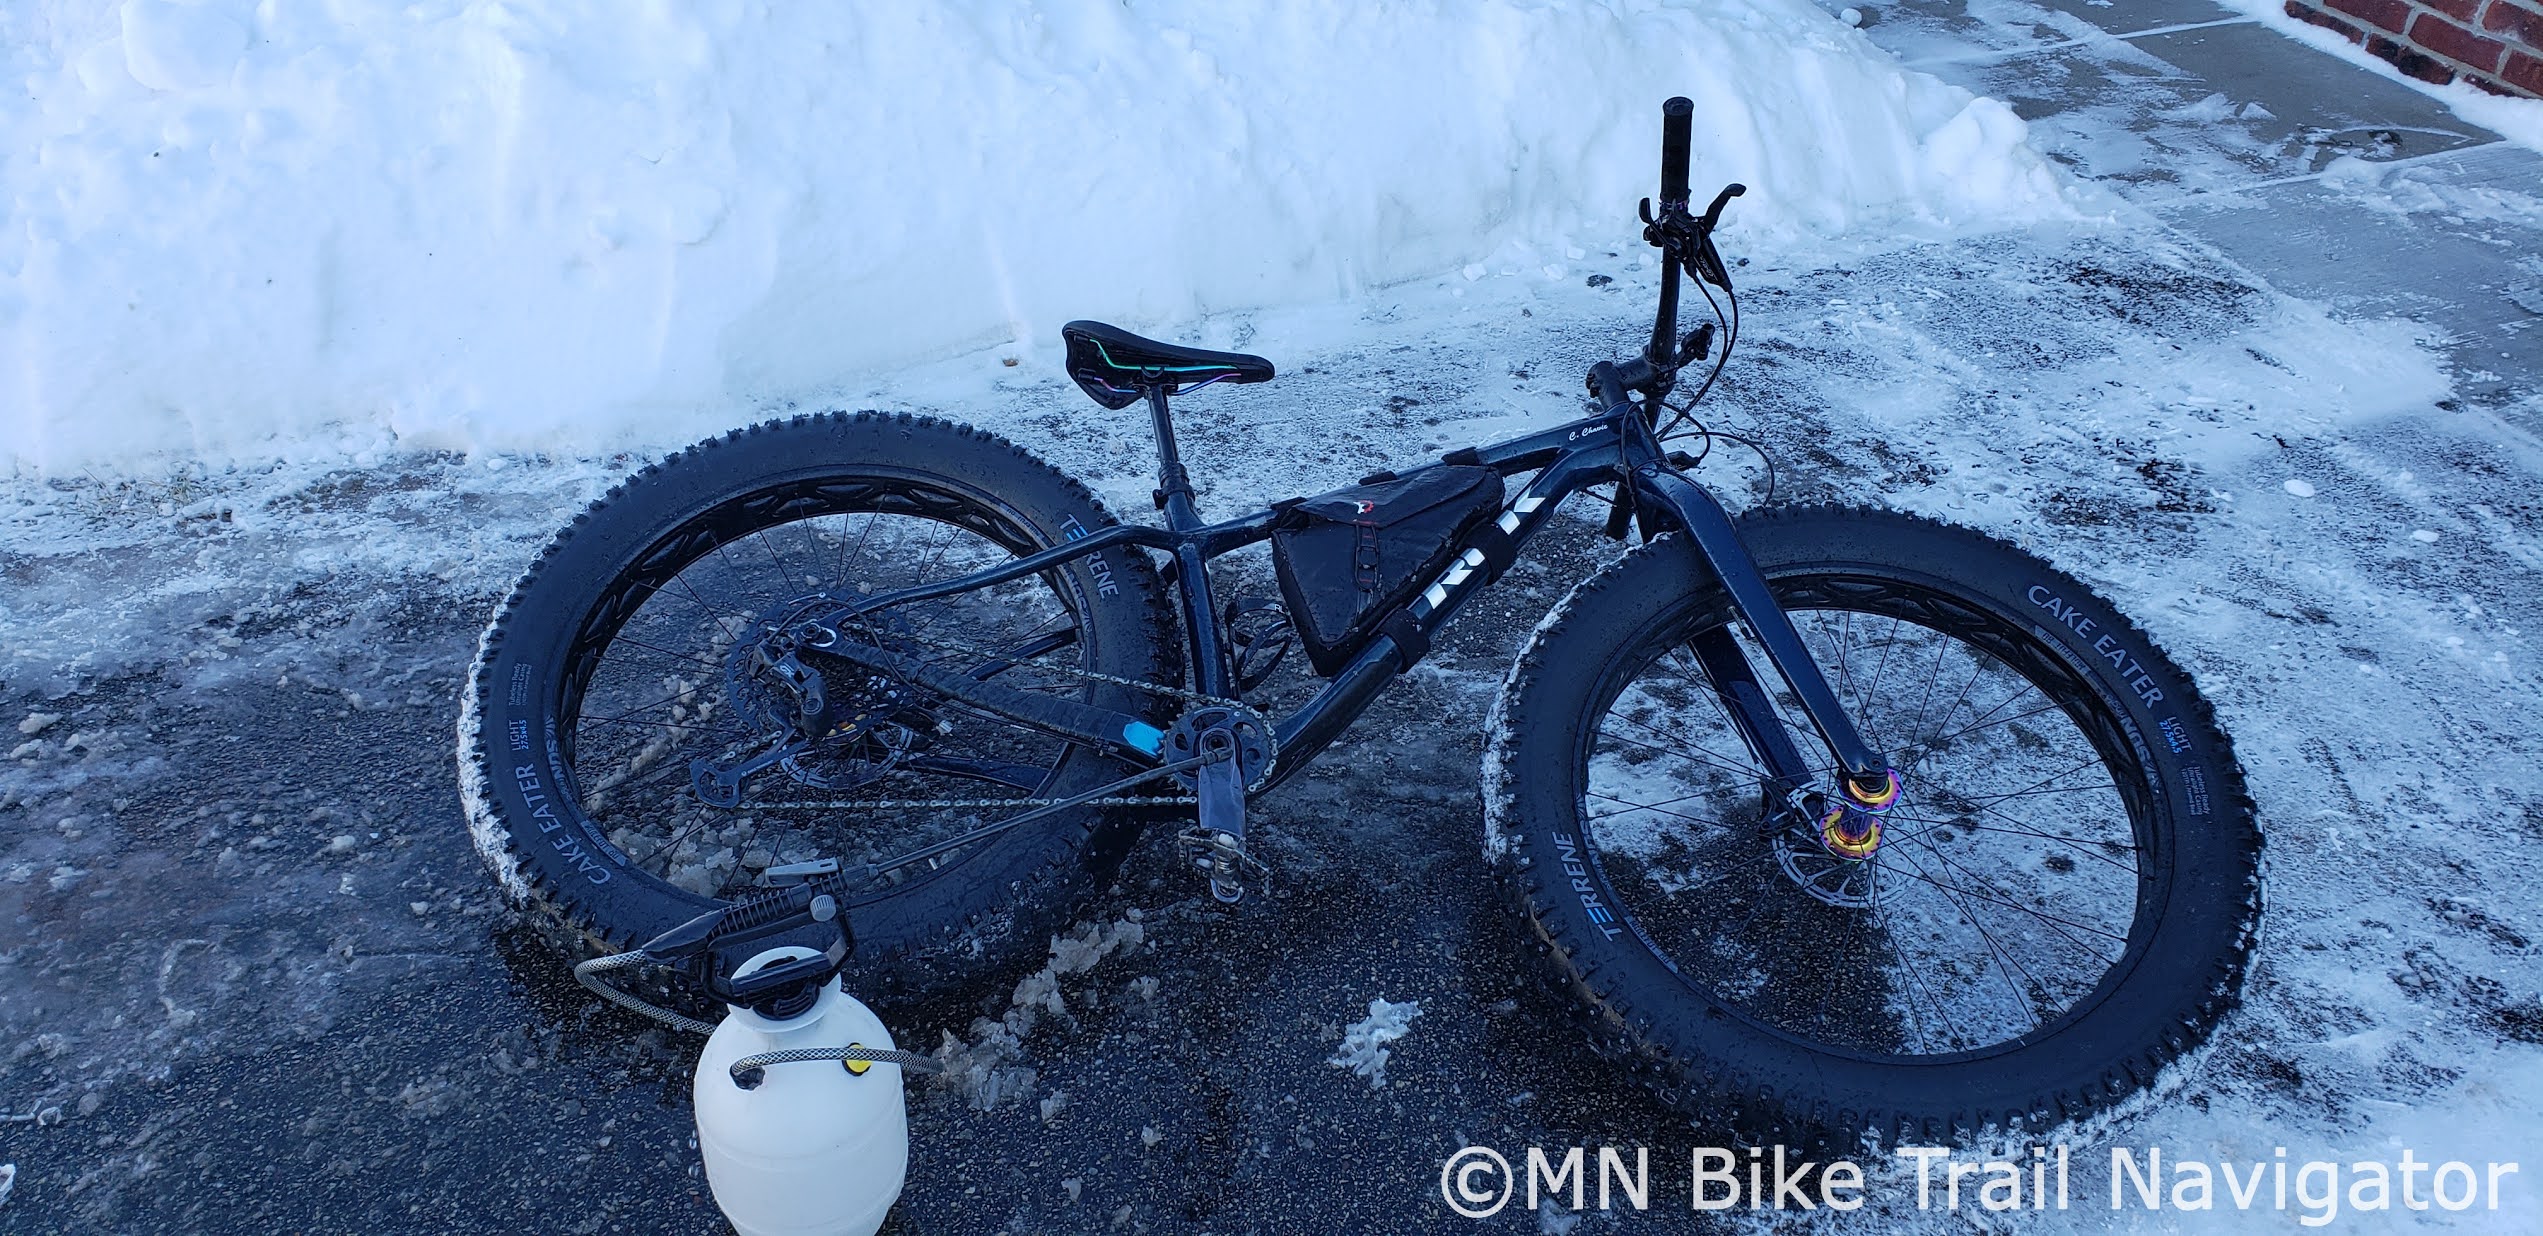
The transition to spring can make your bike a little messy.  Road salt mixed with snow melt can wreak havoc on your bike's drivetrain and components so a good wash down after a ride in these conditions is recommended.  Sand and dirt on roads and trails is more prevalent this time of year so you may find your bike needs a wash more frequently than during the summer months.    

It appears we are going to get an early spring so break that bike out of its long winter slumber and get out there and ride.  Remember, there is no such thing as bad weather, just bad clothing choices.

5/06/2020

The Joys of Riding After Dark


I've always liked biking after dark but in this time of social distancing I am enjoying it even more for numerous reasons.  With Minnesota's current Stay at Home Order people are doing their exercise or getting out of the house for a while during daylight hours.  This has caused congestion on local trails and in parks making social distancing more difficult.  This is where biking after the sun goes down is the perfect time to get in that daily ride.  In this post I will go over the benefits of riding at night and provide you with some helpful tips to be safe and have fun.


The trails at your favorite park are almost empty, go ride them. Just be sure to abide by the park's visitor hours.


Get out a little before dark to take in the sunset.  I've seen a lot of sunsets from the saddle and it never gets old.


Some areas around the city that have too much traffic to ride safely during the day have almost none once the sun goes down.  This is when I ride the areas that I normally would not go during daylight hours.


Mountain biking at night is a blast and in most cases you'll have the trail to yourself.  Work on those night singletrack skills and experience that old familiar trail in a new light.  I ride with a light on my bars and one on my helmet so I can see better through the turns, find my line and navigate obstacles scattered along the trail.


I've been doing a lot of  bike from home rides recently and riding at night is a fun way to explore my local trails in a new way.  Most trail users have gone home by the time the sun sets making it a great time for riding and practicing safe social distancing.

Tips for riding at night


Drivers may not see cyclists after dark so increase your odds of being seen by using reflectives placed on you or your bike.  While lights will get you seen from front and behind, reflectives will let drivers know you are there from many other angles up to 500 feet away.  I use Brilliant Reflective's Stick-on Reflective Strips strategically placed on my bike for maximum visibility when riding at night.


During night rides I will adjust my headlight beam frequently depending on the speed I am traveling.  The last thing I want to do is overdrive my headlight and hit that pothole or fallen tree branch I didn't see.


Intersections are dangerous during daylight hours and the darkness can make a cyclist even less visible.  Approach with caution and use your lights and positioning to let motorists you are there.


The last thing you want when riding at night is to have a light that is giving you a low battery indicator.  Make sure your lights are fully charged before a ride and know the length of run time for its various modes so you don't cut your battery short.  For longer rides I will bring a backup headlight in case I use up the battery on the first light before the end of my ride.  Then I can simply swap it out and continue riding illuminated.


Whether you're a mountain biker, roadie, graveleur or trail rider, getting out on your bike at night is very enjoyable and easy to practice safe social distancing.  The winds have died down, people are at home, the nocturnal creatures are starting to come out and the trail or road is all yours.  Night rides are the perfect way to unwind after a long day or to take that next bike adventure.  For more information on riding at night visit the Night Riding section of Bike MN's Minnesota Bicycling Handbook. Be safe, be seen!

11/01/2019

Fall Weather Cycling Tips


Fall is now upon us leading to changing weather and road/trail conditions for cyclists.  While this change of season can present some hurdles to getting out for a ride, these can be overcome with the right equipment, apparel and a little know-how.  In this post I will present some of the tricks and safety tips that I have learned over the years commuting and riding during this transitional season.

See and Be Seen


Fall means less daylight hours and darkness begins to set in during the evening rush hour.  Get yourself some quality rechargeable LED lights to see and be seen by motorists.  Cloudy days and pre-dawn hours are also good times to have your lights on.  I'm a firm believer in lights "always on" no matter the time of day to increase my visibility.


Adjust the angle of your front light to accommodate for speed or conditions so as to not over drive your headlight.   Over driving your headlight coverage can put you in danger of hitting obstacles, potholes and other road hazards.


Exercise caution at intersections, especially during dark hours.  Motorists aren't always expecting cyclists to be out during the cold months and any way you can get their attention before crossing can keep you from being hit.  I will use a loud whistle to make my presence known if I think motorists are unaware of me.  If you are not sure whether a motorist knows you are there, err on the side of caution and don't put yourself in a position that could lead to being struck.  It is better to be safe than sorry.


Reflectives, in addition to lights, will help get you seen during low light hours.  I use Brilliant Reflective Stick-on Strips placed on my forks for approaching traffic and on my seat stays for better visibility from behind and the side.  These strips are made with 3M Scotchlite Reflective Material that is super bright and can be seen from up to 500 feet away letting motorists know of your presence.  Bike bags and apparel with reflective accents and brightly colored clothing are also good choices after dark to make yourself more visible.


There are a lot of anti-fog products on the market as well as many home remedies that you can find online to keep your glasses or goggles clear in the cold.  I use one on my daytime and nighttime eyewear to avoid that irritating fogging of my lenses.  Using a neck gaiter, balaclava, scarf or working up a sweat can fog up your glasses quickly and using an anti-fog of some sort will keep you seeing clearly.

Road Conditions


The freeze/thaw cycle of fall can present some road hazards that you won't experience in warmer weather.  Frozen puddles and frost in the shadows can can present some slick riding conditions so keep alert and avoid these obstacles to keep your bike "rubber side down".


Fallen leaves on roadways and bike paths can hide potholes, frozen puddles and other obstacles you want to avoid to ride safely.  Moving over may mean you will have to take the lane to get safely by.


Check your tire pressure often and adjust accordingly as cold weather can lead to decreased psi.  Lowering your tire pressure can help put more of the tire in contact with the road providing better traction but release too much air and you risk pinch flats.  A lot of bike commuters will switch over to a wider tire choice this time of year to put a little more rubber on the road for a more confident ride feel.  I swap out my 35 mm tires to a wider 45 mm each year at this time.

Clothing Choices


Get your clothes picked out the night before based on the weather forecast for your commute or ride to save time getting ready in the morning.  This will also help to make sure you don't forget anything.

This is the time of year I start using all of my baselayers to provide the warmth and wicking needed to ride comfortably.  I use wool, polyester, and wool blends of different thicknesses to cover a wide variety of temperatures.  After some trial and error over the years I have gotten pretty good at picking the right one to pair with my jacket selection.  The key is to start out a ride a little chilly because you will start to generate your own heat soon enough.  Choosing a baseleayer that is too warm for the temperature will leave you starting out warm and cozy but soon lead to  overheating causing excessive sweat that will have you wet and chilled.


A neck gaiter and a windproof/breathable beanie under the helmet provides some extra warmth on chilly mornings and evenings.  When things warm up during the ride they can be removed and stored in a jacket pocket.


Get yourself a good pair of windproof/waterproof shoe covers to keep your feet warm and dry.  I wear mine over my cyclocross boots with wool socks to give me extra riding time in below freezing temperatures.


Keep the cold out with a quality windproof and breathable soft shell jacket.  It will cut wind's bite and let moisture and heat escape to help regulate your body temperature.  Jackets with zipper venting under the arms or in the front can be opened to cool you down so you don't become overheated and can be closed when you're comfortable again.  I'm a big fan of Gore Windstopper and Bontrager soft shell jackets but there are a lot of good choices out on the market.  If you don't have one of these in your cycling apparel arsenal, buying one is well worth the investment for cold weather cycling.

Riding during the fall months that lead into winter can be enjoyable with the right gear and know-how.  Don't let the cold or shorter days cut your riding season short.

7/26/2019

Use Maplocs Cycling Route Planner for Android to Easily Plan Rides


Maplocs Cycling Route Planner is an excellent free app for Android devices to map out rides, check elevation profiles, estimate ride time and export planned routes to gps devices and apps. It's simple to use and very convenient making it my go-to app for planning rides quickly without the use of a desktop computer.

Planning the Route


Planning the route is as easy as tapping the screen to plot your points. Mistaken points can be removed by tapping the undo button and this removes the last point.  Location and distance from the last point appear at the bottom of the screen for each plotted point.  Once the desired route is completed there are numerous options to take it from there by tapping the bicycle button in the lower right-hand corner.


These options allow the user to save the route, show the elevation profile, export a GPX file or send to a connected Garmin or Wahoo device.  The "Show Directions" option will have in-app navigation coming soon but for now Google Maps will not use the route created in Maplocs.


The settings for the app are pretty simple, select the unit of measurement, route type, input your average speed, select map type and Garmin or Wahoo for the connected bike computer.  Feedback and contacting the app developer can also be done from the settings menu.

Exporting Routes 


For those that don't have a Garmin or Wahoo device, Maplocs makes it easy to create a GPX file for export into an app or other gps device.  After tapping the bicycle button in the lower right corner select "Export GPX", enter the name for the file and select "Create".  The gpx file will be saved in the Maplocs folder on your phone for sharing or export.


For Garmin Connect and Wahoo Fitness users it's even easier to get the route on your Garmin or Wahoo gps device.  Tap the bicycle button, select "Send to Garmin" or "Send to Wahoo" and the Garmin Connect or Wahoo Fitness app takes it from there.

Shown above and below are screenshots from the Garmin Connect app once I sent the route to Garmin.  The Garmin Connect app opens up and shows pertinent information about the route and allows for editing of the course name, type and privacy setting.  Selecting the star in the right top corner will put it in your favorites in Garmin Connect.  To get the route on the Garmin device simply select the "Send to Device" option from the drop down menu in the right corner.  Next time the Garmin is turned on it will download the route if connected to wi-fi otherwise it can be synced by connecting via USB cable to a computer using the Garmin Connect desktop app.


I was amazed how easy it was to create a route, save it and send it to my Garmin device for navigation.  No more plotting out a route on my desktop computer, saving and dragging it onto my Garmin Edge.  Now I simply hit the "Send to Garmin" button in the app, edit the course details, "Send to Device" and turn on my Garmin Edge Computer with available wi-fi to download the route automatically.  What could be easier?  Try out the Maplocs Cycling Route Planner today and ride somewhere new.

7/18/2019

Take a Bike Camping Trip to Carver Park Reserve


Bike camping was something I wanted to try ever since I heard about the bikes-only campsite at Carver Park Reserve from an article I saw a couple years ago by Bikeverywhere's Doug Shidell.  I didn't get around to it last year, but this spring I started purchasing the camp and bike gear I would need.  After some Internet research I had an idea of the gear that would work best to travel light, be comfortable and to carry most of it on the bike.  I took some time to gather together what I would need and packed it all on the bike for testing and tweaking.  I wanted to make sure my bike handled properly with all the extra weight and if anything needed adjusting.  It's better to find out during a test ride and fix it than having a problem on the actual camping trip.


I was now ready to camp and saw that Farmstead Bike Shop was hosting three free bike camping trips to Carver Park Reserve so I decided to to join them for their June outing.  I wanted to get some mileage out of the trip so I decided I would ride from my house in the south metro up to Minneapolis for the meet up at Farmstead.  We then rolled out to the campground with a pit-stop at Excelsior Brewing making it a nice 48 miles for the day.  We set up camp, relaxed and socialized by the fire.  It was a fun trip and the folks from Farmstead were very hospitable.  If you are new to bike camping and want to give it a try I would recommend joining them for their last outing of the season on July 27th.


The 2019 camping season for Carver Park Reserve runs from April 26th to October 27th.  The park has a drop-in, bike-in-only shared campsite at the Lake Auburn Campground that does not take reservations.  The site can accommodate up to six tents and the camping fee is only $10/tent per night.  For larger groups or those wanting a guaranteed site the park has five rustic group campsites that can be reserved online.


Accommodations include a commons area with picnic tables, benches, fire ring and bike rack.  Vault toilets and water are available nearby.  Don't worry about gathering firewood as it is delivered by the park for free.


Getting there is easy since Carver Park Reserve is accessible from the Lake Minnetonka LRT Regional Trail.  For the best bike-friendly routes to the campground use Google Maps with Bicycling Directions to help plot your course.  It will give you several routes to choose from showing elevation change and mileage for each.  Pair your phone with some earbuds or a speaker for turn-by-turn navigational directions using the route you chose on Google Maps.  For GPS device users, a route can be plotted on RideWithGPS or many other cycling mapping sites where a gpx, tcx or tif file can be downloaded and loaded into your device for navigation.  RideWithGPS has an option to print cue sheets also.


If you've been bike camping before you probably already know what to pack.  For those trying it out for the first time, below is a list of things you may want to bring along.


Tent/hammock/footprint
Camp stove/cookware
Sleeping bag
Sleeping pad
Clean cycling/lounge clothes
Toiletries
Battery backups and usb cables
Flashlight/LED lantern
Food/water
Footwear
Washcloth/camp soap/wet wipes
Tool kit/tubes/co2/pump
Matches/fire starters
Cell phone


One rule of thumb that I follow is to keep my gear waterproof.  I use drysacks, roll-top pvc bags, Ziplocs and waterproof bike bags to keep my gear dry.  Camping can get damp and occasional unexpected rainfalls will happen but if your gear is in waterproof bags it makes the experience much more comfortable.


I had a great time bike camping at Carver Park Reserve and plan on doing it again.  The site, amenities and location make it a great spot for giving bike camping a try or just taking a quick overnighter for a little getaway.  Happy camping.
Related Posts Plugin for WordPress, Blogger...